Automating Text Extraction from Screenshots with a Bash Script
Automating Text Extraction from Screenshots with a Bash Script
Imagine if you could take a picture of anything on your computer screen, and it would magically write down all the words from the picture. Cool, right? Well, today, we’re going to learn how to make that magic happen with a little help from a script in your computer!
The goal is to create a script that will take a screenshot, find the words in it, and copy those words to your clipboard.
What You Need Before We Begin
Before we start, we need a couple of tools:
- Gnome Screenshot: This is like the “camera” on your computer. It takes pictures of your screen.
- Tesseract OCR: This is the “reader” that reads the words from the picture.
To install them on Ubuntu 24.04 (the “Noble Wombat” version), open a terminal by pressing Ctrl + Alt + T and type the following:
1
2
sudo apt update
sudo apt install gnome-screenshot tesseract-ocr xclip
Just press Enter after each line, and your computer will do the rest!
Step 1: Open Your Text Editor
We’re going to write a script, kind of like writing instructions for your computer to follow. We’ll use a program called nano.
To start, type:
1
nano my_ocr_script.sh
This opens up a blank page called my_ocr_script.sh.
Step 2: Writing the Script!
Indentation is an essential practice in scripting and coding that involves adding spaces at the beginning of lines. This technique makes the structure of your code clearer and easier to follow. In a script, indentation visually groups commands or actions, much like steps in a recipe, showing which parts belong together logically.
For instance, in an if statement, everything inside the block is indented to indicate that those commands are only executed when the condition is true. This organization not only helps you keep track of the flow of your code but also makes it much easier for others to read and understand your work. Proper indentation improves the overall readability, maintainability, and collaboration potential of your scripts.
By following best practices for indentation, you enhance the clarity of your code—whether it’s for yourself or for contributors who might work on it in the future.
To see an example of proper indentation in action, check out this OCR Bash Script on GitHub. Here, indentation is used to clearly structure the flow and logic of the script, ensuring that each condition and its related actions are neatly organized.
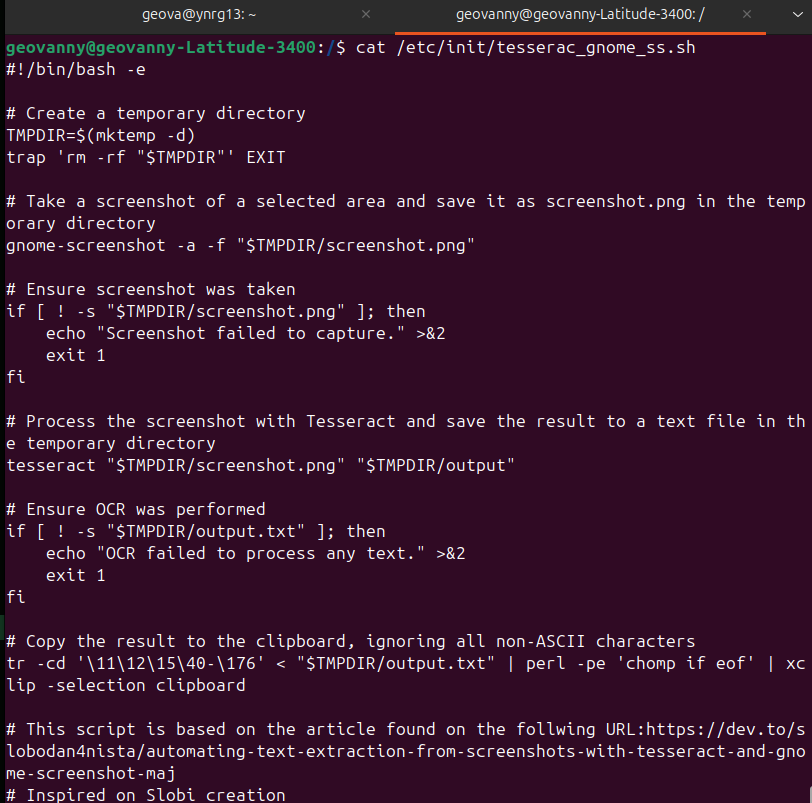
Here’s the bash integration that helps your computer read words from a picture:
1
2
3
4
5
6
7
8
9
10
11
12
13
14
15
16
17
18
19
20
21
22
23
24
25
26
#!/bin/bash -e

# Create a temporary directory
TMPDIR=$(mktemp -d)
trap 'rm -rf "$TMPDIR"' EXIT

# Take a screenshot of a selected area and save it as screenshot.png in the temporary directory
gnome-screenshot -a -f "$TMPDIR/screenshot.png"

# Ensure screenshot was taken
if [ ! -s "$TMPDIR/screenshot.png" ]; then
    echo "Screenshot failed to capture." >&2
    exit 1
fi

# Process the screenshot with Tesseract and save the result to a text file in the temporary directory
tesseract "$TMPDIR/screenshot.png" "$TMPDIR/output"

# Ensure OCR was performed
if [ ! -s "$TMPDIR/output.txt" ]; then
    echo "OCR failed to process any text." >&2
    exit 1
fi

# Copy the result to the clipboard, ignoring all non-ASCII characters
tr -cd '\11\12\15\40-\176' < "$TMPDIR/output.txt" | perl -pe 'chomp if eof' | xclip -selection clipboard
Let’s break down what we just wrote:
- #!/bin/bash -e:
shebangThis tells the computer, “Hey, I’m about to write some instructions. Follow them very closely!” - TMPDIR=$(mktemp -d): This makes a temporary folder, like a secret hiding place for our screenshot.
- trap ‘rm -rf “$TMPDIR”’ EXIT: When the script finishes, it will clean up that secret folder to keep everything tidy.
- gnome-screenshot -a -f “$TMPDIR/screenshot.png”: This takes a picture of the part of the screen you select.
- tesseract “$TMPDIR/screenshot.png” “$TMPDIR/output”: This reads the words in the picture and saves them.
- xclip -selection clipboard: Finally, this copies the words to your clipboard, so you can paste them anywhere!
Step 3: Save the Script
To save what you’ve written, press Ctrl + O, then Enter. To exit nano, press Ctrl + X.
Step 4: Make It Executable
To make our script executable, which means telling the computer it’s okay to follow these instructions, type:
1
chmod +x my_ocr_script.sh
Step 5: Run the Script
Now just type:
1
./my_ocr_script.sh
When you do, your mouse will turn into a crosshair. Click and drag to select the part of your screen you want to capture, and… poof! The text will magically be copied to your clipboard!
Making It Even Easier: A Keyboard Shortcut
Let’s set it up!
- Open Settings: Click on the gear icon (Settings) in your Ubuntu desktop.
- Keyboard Shortcuts: Go to Keyboard Shortcuts.
- Add Custom Shortcut:
- Click on Add Shortcut.
- Name: Let’s call it “OCR-Image2Text”
- Command: Type the path to your script. If it’s in your home folder, it will look like:
/home/yourusername/my_ocr_script.sh. - Shortcut: Click to set a new shortcut, and press Ctrl + S (or any keys you like).
Now, every time you press Ctrl + S, you can use your magic to copy text from your screen!
- Error Handling: In our script, we added checks to make sure both the screenshot and the text extraction worked properly. If they don’t, we tell the user what went wrong.
- Temporary Directory: We use a special folder that disappears automatically when we’re done—this keeps things neat and tidy.
- Clipboard Clean-Up: We make sure only clean, readable text is copied to the clipboard, filtering out all those funny characters computers sometimes see.
Now you have a script that takes a screenshot, reads the words, and copies them straight to your clipboard—all with just a few key presses. It’s like having a superpower on your computer!
Remember, this script is fully customizable. If you want to change the key shortcut or even what happens to the text, you can tweak it any way you like. And if you want more tips and tricks, you can always check out amazing resources like the ones we used, including the detailed guides on Ian Baker’s blog and other links to make your scripts even more efficient!
Feel free to explore and enhance your magic. The world of Bash is limitless—and now, it’s your playground!
Why not try adding more features? Maybe you could save the extracted text to a document or even translate it!

